
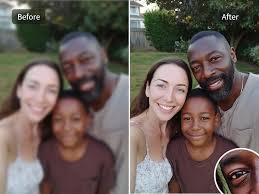
Blurry photos can ruin a great shot. Sometimes the problem is a shaky hand or low light. Other times, the camera focus just misses. You don’t have to accept blurry images as final.
With the right methods, you can restore sharpness quickly. Learning how to unblur an image can save your best memories. Keep reading to find practical tips and tools to get clear photos fast.
These strategies will help you improve every shot you take.
Check Your Original Photo Quality
Start with the highest quality version of your photo. Low-resolution images are harder to fix. Avoid compressed files if possible. A clear original gives better results when you try to unblur.
Check for the size and format before editing. Larger files retain more detail for corrections. Always back up the original in case you need it. This ensures you won’t lose data while experimenting. Keep the original safe before applying any edits.
Use Software Tools Wisely
Editing tools can sharpen blurry photos quickly. Some tools focus on removing motion blur. Others adjust focus and contrast. Start with basic settings before using advanced features. Overdoing edits can make the image look unnatural.
Adjusting sharpness slightly can restore clarity. Compare before and after views to track progress. Work slowly to avoid damaging details. Using software correctly saves time and effort.
Adjust Sharpness Carefully
Increasing sharpness can make details stand out. Too much sharpness creates noise or halos. Apply small increments at a time. Focus on areas that need it most. Use preview tools to check results.
Combining sharpness with contrast helps overall clarity. Avoid applying it uniformly to the whole image. Focus on main subjects first. Sharpness control is key to improving blurred photos.
Reduce Noise
Noise often hides details in blurry images. Noise reduction removes grain and smooths textures. It can make your image look cleaner. Use moderate settings to avoid blurring edges.
Combine noise reduction with sharpening for better effect. High ISO images benefit from noise control. Preview changes at full size for accuracy. Small adjustments make a big difference. Reducing noise improves perceived sharpness significantly.
Fix Motion Blur
Motion blur comes from moving subjects or shaky hands. Some tools specialize in motion blur correction. Adjust settings to match the type of blur. Horizontal and vertical motion may need different fixes.
Work gradually to avoid creating artifacts. Combining stabilization and sharpening helps clarity. Motion blur tools can restore lost details effectively. Keep the focus on the main subject. Correcting motion blur brings life back to your image.
Enhance Focus
Sometimes the blur is just soft focus. Focus enhancement tools can sharpen edges. Apply small corrections to avoid oversharpening. Check fine details to make adjustments precise.
Layer multiple small adjustments if needed. This method keeps the image natural. Focus on important objects first. Compare multiple versions to choose the best. Enhancing focus recovers the intended clarity.
Use Layer Techniques
Layers allow selective editing of blurry areas. Work on problem areas without affecting the whole image. Apply masks to control where changes happen. This keeps backgrounds smooth while fixing subjects.
Layer adjustments can be undone easily. It allows more precise corrections. Combine layers for multiple effects. Use opacity control to blend changes naturally. Layers give flexibility in unblurring photos.
Try Edge Detection
Edge detection highlights lines and borders in images. It can bring out details hidden in blur. Apply subtle adjustments to edges only. Too strong detection makes the image look artificial.
Combine with sharpening for better results. Focus on key elements in the photo. Edge techniques help recover lost definition. Preview changes carefully before saving. Edge detection works best for structured objects.
Adjust Contrast and Brightness
Improving contrast can make blurred areas clearer. Brightness adjustments reveal hidden details. Avoid overexposing or darkening important parts. Small tweaks enhance visibility without affecting quality.
Combine with sharpness for a balanced effect. Test changes on different screen sizes. Proper contrast and brightness restore natural depth. Adjusting these settings improves perception of sharpness. Use preview tools to finalize the look.
Upscale Smartly
Upscaling can recover details if done correctly. Avoid simple enlargement, which increases blur. Use smart upscaling techniques to keep edges sharp. Some software interpolates pixels for better clarity.
Upscaling works best with high-resolution originals. Check for artifacts introduced during resizing. Small increments give more control over results. Upscaling images helps when you need larger prints. Proper upscaling improves overall image clarity.
Apply Selective Color Correction
Blurry areas sometimes benefit from color adjustments. Increasing color contrast can enhance perceived sharpness. Focus on key subjects for selective correction. Avoid altering the entire image, which can affect balance.
Use masking for precise adjustments. Subtle changes make images more vivid. Check shadows and highlights carefully. Color correction restores detail without adding artifacts. Adjust colors to guide the viewer’s eye.
Use Online Tools for Quick Fixes
If you need a fast solution, online tools are helpful. Some platforms let you unblur image in minutes. Upload your photo and adjust settings with simple controls. These tools work well for minor blur or low-quality images.
They are convenient when software is unavailable. The results are often good enough for social media or sharing. Compare the processed image with the original before saving. Online solutions save time and effort. They are ideal for quick clarity fixes.
Save and Compare Results
After editing, save multiple versions of your image. Compare each version for sharpness and natural look. Keep a copy of the original for reference. Minor adjustments may need repeating.
Evaluating results ensures the best output. Use proper file formats to maintain quality. Consider feedback from others if possible. This process confirms improvements are effective. Saving and reviewing ensure consistent quality in every shot.
Preview on Different Devices
Check your photo on different devices to see how it looks. Phones, tablets, and computers can show different levels of sharpness. A picture that looks clear on one screen may seem blurry on another.
Look at the image on at least two devices before saving. Make small adjustments if needed for brightness or sharpness. This helps your photo look good everywhere. Export in the right size for each device. Previewing prevents mistakes you might miss on one screen.
Learn How to Unblur an Image Fast
Clear images make photos more memorable. Applying these techniques helps restore clarity effectively. Use sharpening, noise reduction, and focus adjustments carefully.
Correct motion blur and enhance edges for better results. Online tools provide a quick alternative when needed. Always back up your originals before editing. Follow these steps to make every shot look its best.
For other topics, check our blog!